Dries Cappon
As designers & developers, we strive to offer everything that appears on our websites as beautifully and sharply as possible on all screens and devices. In addition, we also want to keep the file size within limits. As far as icons, logos and illustrations are concerned, there is actually only one good way to meet these expectations, namely using Scalable Vector Graphics (SVG).
Because there is so much information to share about SVGs, we will split this information into 3 different blog posts. So keep an eye on our social media channels so as not to miss the sequel to this blog post!

Scalable Vector Graphics is an XML based file format for 2-dimensional vector graphics. SVG offers several possibilities to add animation and interactivity to the image. An SVG image can be manipulated with code (CSS & Javascript) which makes it a much more powerful format than JPG or PNG.
Whereas JPG, PNG and GIF are based on a pixel grid, SVG is constructed from vectors. An SVG file looks like an XML file, in which the vector drawing is described. Because vectors are mathematically calculated lines, an SVG image will be shown sharply on all sizes.
Before we add an SVG to a web page, we must prepare the file. That is quite simple. You can export SVGs from your favourite vector editor (Illustrator, Sketch, Inkscape...) or even from Photoshop if you use Shape-layers. In this article Adobe Illustrator is used as editor, but the same principles apply to most other editors. The aim of the preparatory work is to limit the SVG in file size while maintaining manipulation capabilities.

Pathways, groups and layers
A vector image in your editor often consists of a collection of paths, grouped or not. More complex drawings can be spread over several layers. It is best to simplify your SVG as efficiently as possible. It's best to keep in mind what you want to do with your image later on. Is it about a simple icon, or about an image in which animation will be added later?
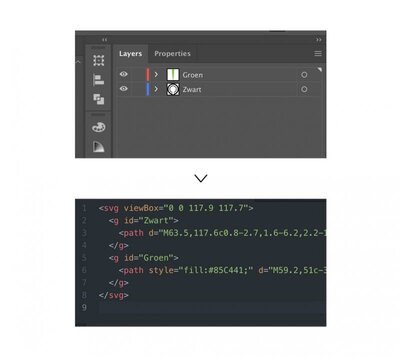
If you are planning to animate parts of your image, it is best to group all the different components of your image here. When you export your image in illustrator, a group is created per layer with the name of your layer as id (<g id='Layer_1'>).
In illustrator you can combine multiple paths to 1 via Compound path. This makes the SVG code much clearer and shorter. It is best to combine paths with the same colour in this way.
Styles
When you export a SVG in illustrator, there are several options. You can choose to render CSS properties (among others) as Style-elements or Style-attributes. Both methods have their advantages.
CSS properties as Style attributes will add the css properties as inline styles on the <path> or <g> tags. This is often the best option for simple images such as icons. The downside is that the css properties are added per path tag, so this can lead to double style definitions.
Adding CSS properties as Style-elements will add a style tag in your SVG in which CSS classes will be provided. These classes will then be added to the <path> or <g> tags via the class attribute. This allows you to have multiple paths use the same CSS class. Make sure that the illustrator generates the class names himself (.st0, .st1, .st2 ...). If you add multiple SVGs inline to a page, this can lead to problems. The class definitions then exist in the scope of the page. For example, the first icon on the page may suddenly inherit the colour of the last icon on the page. It is therefore best to change the class name.
Keeping the file size of your SVG down is important. For this you can use SVG optimizers. There are several systems available. SVGOMG is an easy to use online tool (https://jakearchibald.github.io/svgomg/) You simply paste your SVG code into the editor and you can download your optimized image (or copy the optimized code). This allows you to quickly reduce the file size up to 60-70%.
You can also add gzip compression for svg's in the .htaccess file of your website.
There are several options available to add a SVG image to your page. Some methods have specific advantages, others are best avoided. An overview...
<img>-tag
Just like you add other images, you can also add SVGs with a <img> tag to your page. This method offers few possibilities for manipulation.
background-image
In your CSS-file you can add an svg as a background image. However, this method offers few possibilities for manipulation. It is best not to encode the image base-64 because this blocks loading other styles while downloading. Note: if you want to use the image responsive, you must add a padding botom with the % ratio of your image. Otherwise the SVG will not be shown.
<object>-tag
The <object> tag is the best option if you want to add SVGs to your page without putting them inline. This method allows you to manipulate the SVG.
Inline
If you add a SVG image inline to the page, you save an HTTP request. Please note that the image will not be cached by the browser. This is the easiest way to manipulate SVGs, but many inline SVGs can be difficult to manage.
Which way you use to add your SVG to your page depends on the specific situation. An <object> tag will be the best solution in most cases.
Soon you will read more about SVG in part 2!