On 2 May 2018, Google launched the Google maps platform to simplify the existing APIs. The 18 separate APIs are reduced to three products: maps, routes and places. The biggest change, however, lies in payment. You will be obliged to add a payment method. If you do not, the integrations on your website will change to low resolution and the disclaimer "for development purposes only" will be added. This will be implemented from 11 June 2018. Read here how to avoid this. At the bottom you will find a concrete step-by-step plan with screenshots.
  • What will change on 11 June?
    On 11 June, all Maps integrations that have not added a payment method and therefore do not have a valid 'API key' in low resolution will go on sale and a disclaimer will appear. Absolutely avoidable.

  • Does everyone have to pay for the API?
    Up to a certain volume you will still be able to use the Google Maps APIs for free. But even if you do not exceed this volume you will have to add a valid payment method.

  • How much is the free volume?
    You can use 3 Google maps products for free for the equivalent of 200 dollars per month. Moreover, mobile use remains (for the time being) unlimited free of charge. The $200 corresponds to 14,000 to 100,000 loading actions depending on the type of map you have, static/dynamic and maps/streetview. For many (smaller) websites this will suffice.

  • How much do you pay if you exceed the free volume?
    Prices vary from $1.6 to $14 per 1000 load actions, depending on the type of folder and total number of load actions (price decreases with larger volume). A very big difference. That's why you should check what type of folder is on your website. The full price table can be found here.

  • How do you avoid a high bill?Go to your billing settings on Google Cloud and set a budget. You can also set up notifications so you'll get an email when you get closer to that limit. Also check where the Google Maps are on your website. For example, some websites may have a location folder in the footer, so you might want to replace it with a photo. You can then keep the Google map on your contact page.

Roadmap: add google maps API key

Don't have a valid API key yet? Then follow the step-by-step plan below! You only need a credit card (VISA/Mastercard/American Express).

Google maps API key screenshot

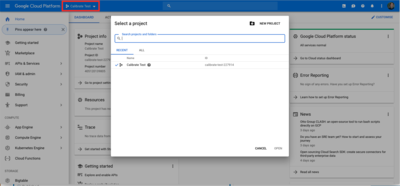
1. Select the correct project, in this case 'Calibrate Test'.

google_maps_api_key_screenshot_2.png

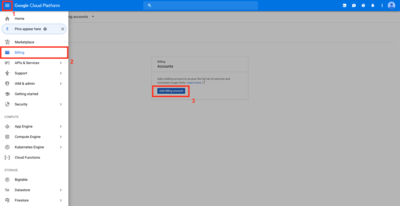
2. Via the hamburger icon at the top left, go to 'Billing' and choose 'Add billing account'.

google_maps_api_key_screenshot_3.png

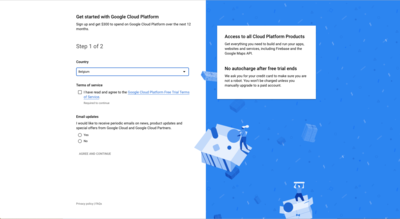
3.  You will now be redirected to the Google Cloud Platform registration page. 
Go through the steps and add a credit card (VISA/Master Card/American Express).  

google_maps_api_screenshot_4.png

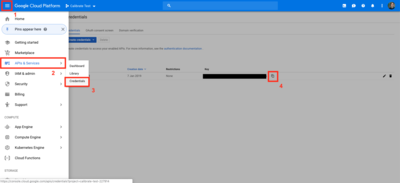
4. Now that your credit card has been added you can find an API key in your account. Go (again via the hamburger icon) to 'APIs & Services' and the tab 'Credentials'. Here you will find the API key and a button to copy it. You pass this API key on to your developer.

google_maps_api_stap_5.png

5. The developer adds these to the Javascript API so your API Key is verified and the watermark disappears.